Quantcast
Channel: Charitha's Web Log
Viewing all 66 articles
Browse latest View live

OAuth 2.0 grant types with WSO2 API Manager - II - Implicit

$
0
0
This is the second of a series of posts related to OAuth-2.0 grant types in WSO2 API Manager (WSO2 Carbon platform). Therfore, I strongly suggest you to read and work on the examples described in the first post before proceeding with this.

In this post, we will go through Implicit grant type which is the recommended practice if your application (client) is a mobile application or a browser based app such as a JavaScript client.  The key difference of implicit grant when comparing to the Authorization Code is, the client receives access token as the result of the authorization request. In our previous post, which was about Authorization Code grant, client had to make separate requests for authorization and access token. Also note that, the implicit grant does not include client authentication because it does not make use of client secret.

Before attempting to work on the sample, let's have a look at the steps involved in implicit grant type.

1.   Application (client) does a token request from the authorization server by sending a HTTP GET request with the following query parameters.

response_type = token
client_id = VALUE_OF_CONSUMER_KEY
redirect_uri = REDIRECT_URL_OF_THE_APPLICATION
scope =  SCOPE_OF_THE_ACCESS_REQUEST

The first two are mandatory parameters where as the last two can be optional. 

2.  Upon receiving the request, the authorization server must return a 302 redirection back to the client with an Location header pointing to the URL of user consent page. (e.g:- Location: https://localhost:9443/carbon/oauth/oauth2_authn_ajaxprocessor.jsp)

3.  User (resource owner) confirms the authorization requested by client (application) by specifying his credentials.

4. Authorization server redirects user back to the application (to the callback url which has been specified at the first step) with the access token.


Let's explore more on the above steps, using our sample web application (acts as the client/application) and WSO2 API Manager (acts as the authorization server).


Step 1


Access the OAuth playground application as instructed in "Setting up client" section in the previous post. Once you click on "Import Photos" icon, you will be landed in a page where you will find a form with various options such as Authorization Grant Type, Client Id etc..

Step 2


Select Implicit as the Authorization Grant Type. 

Copy the consumer key value from the application you have subscribed in WSO2 API Manager (see above) and enter it in Client Id text box.

Specify any string value as scope. We do not really worry about scope attribute in this example. 

Enter callback URL which must be identical to the value you have specified at the time of creating the new application in WSO2 API Manager. 
e.g:- http://localhost:8090/playground2.0/oauth2client

Enter Authorize endpoint. This should be the endpoint of authorization server where it accepts the authorization requests. In WSO2 API Manager, there is an API to handle all authorization requests and it can be accessed through http://localhost:8280/authorize.

Once you completed adding all values in the form in the playground app, click on Authorize.

This will generate HTTP GET request similar to the following. You can see it contains all mandatory URL parameters which we have discussed in point 1 under the general introduction of "Implicit grant type".

GET /authorize?scope=api_scope&response_type=token&redirect_uri=http%3A%2F%2Flocalhost%3A8090%2Fplayground2.0%2Foauth2client&client_id=ePCzEHajPOZRKus4XS3pva_Ec5Ua HTTP/1.1

Host: 127.0.0.1:8281

User-Agent: Mozilla/5.0 (X11; Linux x86_64; rv:7.0.1) Gecko/20100101 Firefox/7.0.1

Accept: text/html,application/xhtml+xml,application/xml;q=0.9,*/*;q=0.8

Accept-Language: en-us,es;q=0.7,en;q=0.3

Accept-Encoding: gzip, deflate

Accept-Charset: ISO-8859-1,utf-8;q=0.7,*;q=0.7

Connection: keep-alive

Referer: http://127.0.0.1:8090/playground2.0/oauth2.jsp?reset=true

Cookie: i18next=en-US; region1_configure_menu=none; region3_registry_menu=none; region4_monitor_menu=none; region5_tools_menu=none


Step 3


When you click on "authorize" with all required parameters, the application generates the above HTTP GET call and you will be redirected to the user consent screen as shown below. 


Click on Authorize. You will be provided with options to enter user name and password (username and password of the resource owner/end user).

Type admin/admin as user name and passeword respectively and click on login.

Step 4


You will receive the Access Token as shown below.


Now, we can use this access token to do the actual API call.

We will explore Client Credentials OAuth-2.0 grant type in our next post.

Working with HTTP multipart requests in soapUI

$
0
0
You can use HTTP request test step in soapUI to submit messages with various Content-Types.  In this post, we will have a quick look into the multipart/form-data requests in soapUI.

multipart/form-data requests usually come into action when you do HTML form submissions with file attachments. For example, have a look at the following HTML form post.

<form action="http://localhost:8090/CKFileUploadApp/UploadServlet" method="post" enctype="multipart/form-data">
<input type="file" name="file">
<input type="text" name="paramName">
<input type="submit" name="Submit" value="Upload File">
</form>

In the forms like above, we have file upload option as a form input where we can upload a file along with the form submission. In that case, the request's HTTP content type will be multipart/form-data. How can we simulate such a request using soapUI?

Pre-requisite:
You can have your own file upload servlet as the backend. But in order to demonstrate the scenario, I have hosted a sample webapp, CKFileUploadApp.war from here. Make sure to change the following context parameter value in WEB-INF/web.xml directory before deploying the web application in Apache tomcat.

<param-name>file-upload</param-name> 
<param-value>/home/charitha/</param-value>

Step 1

Start to create a new soapUI project. Specify a name and select Create Web TestCase option.

Add Web TestCase dialog will be displayed. Enter http://localhost:8080/CKFileUploadApp/UploadServlet as the Web Address. Clear Start Recoding Immediately option and click on OK.

Step 2

Once the new HTTP request is added as explained in the first step, change the HTTP method to POST. The request editor should look like the following.


Step 3


Choose multipart/form-data from the Media Type drop down. Now, click on Attachments tab at the bottom of the request editor (see below).


Click on + icon at the top left corner of the attachment window to browse and attach a file to request. Browse for a file in your local file system and add it as an attachment. Now, the attachment editor will be similar to the following.


Step 4


We have everything ready to send the request with a file attachment. Click on submit button to send the request. You will get a HTTP 200 response with the message "Uploaded Filename: <filename>" message. Click on the raw view of the request. You will see the Content-Type of the request is set to multipart/form-data. You will also notice the relevant MIME boundaries of the request.


Since I have attached an xml file to the request, you can observe the Content-Type of the attachment part of the message as text/xml.


------=_Part_17_31084605.1374474723633
Content-Type: text/xml; charset=UTF-8; name=registry.xml

QA mind-set

$
0
0
In the agile world of software development, quality assurance function is embedded into the main stream development process and it is not considered as an activity managed by a separate QA team.
Even with following many agile testing principles, why do some teams still fail to deliver products/projects with acceptable quality?
According to my experience, I believe the issues with adopting the QA mindset can be considered as the primary reason for many software quality concerns.
So, what is QA mindset and why is it a critical factor in software testing?

If you are a software developer, your primary objective is to complete the implementation of the feature/module which you have been assigned to do without schedule slippages. But, you are obliged to deliver it with best quality. So, you follow good agile testing principles, may be follow TDD (Test driven development),  code reviews, write automation tests, do manual tests for the scenarios which you cannot automate, run performance  tests etc..
However, when your "well-tested" feature is in UAT at your client's environment  or verified by another person, the bug tracking system is filled up with many bugs.
What went wrong in your testing? Why did you miss all these bugs?

Software development has become more and more complex with all kinds of heterogeneous platform integrations which we use in today's applications. You are no longer expected to have the luxury of testing the traditional 3-tier applications. Instead, you need to think about large array of integration scenarios. The complexity multiplies by many factors when you are developing middleware. For example, what are the implications when your app runs on a cloud provider? what can be the behavior when the application is integrated into various DBMSs? what kind of changes can be expected in feature X of your app when it integrates with a third party enterprise application?
How will the application behave when different message types are processed? Will the feature X provide the same functionality with each message type under various platforms?
There can be endless questions!

You should not even think about a process without comprehensive test automation methodology to address such a complex matrix of test combinations.  However, you can never replace human brain by a test automation tool. The test scenarios, which are the inputs for your test automation tool, have to be derived by you. Thus, it is really important to adopt QA mindset in any testing activity regardless of its nature (automated or manual).

QA mindset is all about the approach of looking at the problem at hand. When you develop a feature, you are mostly optimistic about its functionality since your mind forces you to believe that your creation is correct. You are biased towards your own work.
If you seriously want to avoid a third eye complaining about your creation, always use QA mindset in testing. There is a tester inside all of us. Get him out when you start testing!

  • Avoid pre-mature feature completion announcements. Do not judge the functionality by just observing the positive work flow.
  • Think about all possible integration scenarios. Write them down and execute each very carefully
  • If your component consists of feature X, Y and Z, test every attribute of each feature. Do not leave out anything obvious for a third eye to try and complain
  • Conduct more and more exploratory tests. Research on similar features implemented by others and look for missing use-cases.
  • If you are enhancing an existing feature, collect the issues reported by your customers on the old implementation and assess each of them against the new implementation.
  • Maintain a record of what you have tested so that a separate tester will not be repeating the same test scenarios which you have already tried out
  • Do not be fooled by code coverage figures. Try to break your implementation.
A lot of work.. huh? yes.. but at the end of the day, your work has to be part of a production system. So, quality is not something to compromise. Start to love software testing. That is the only way to deliver quality! 

The difference between JSON streaming builder and the default JSON builder in WSO2 ESB

$
0
0
When a request/response is received by ESB, the message will initially be converted into XML infoset. This process is known as message building and the builders are responsible to do this transformation based on the HTTP Content-Type of the incoming message. The default JSONBuilder (org.apache.axis2.json.JSONBuilder) converts the JSON into corresponding XML representation. If I explain this through an example, suppose your incoming JSON response/request is similar to the following.

{
  "getQuote": {
    "request": { "symbol": "charitha" }
  }
}

If you log this message inside inSequence of your message flow (using log mediator), you will observe an output similar to the following.

LogMediator To: http://www.w3.org/2005/08/addressing/anonymous, 
WSAction: , SOAPAction: , MessageID: urn:uuid:f37b8466-7cb3-41d6-9187-b5a0a7648f16, 
Direction: response, Envelope: <?xml version='1.0' encoding='utf-8'?><soapenv:Envelope xmlns:soapenv="http://www.w3.org/2003/05/soap-envelope"><soapenv:Body><getQuote><request><symbol>charitha</symbol></request></getQuote></soapenv:Body></soapenv:Envelope> 


Look at the Body of the SOAP envelope. You may notice the JSON to XML mapping clearly in there.

The message formatters do the complete opposite of builders. They are responsible for formatting the message into the relevant wire format. So, the default JSONMessageFormatter converts XML back into JSON.
Obviously this JSON <--> XML conversion may lead to a certain degree of information loss.

In order to avoid that, we have introduced the JSON streaming builder (org.apache.axis2.json.JSONStreamBuilder) which does not covert JSON message to intermediate XML format. If you conduct the same test which I explained above with streaming JSON builder, you will see a message similar to the following when you use log mediator within the message flow.

LogMediator To: http://www.w3.org/2005/08/addressing/anonymous, WSAction: , SOAPAction: , MessageID: urn:uuid:33d9ad3f-83bc-46ee-adb9-1cafd7e5a9cc, Direction: response, Envelope:

In the above message, there is no XML representation of the JSON message. The Body element is empty.

Therefore, if you use streaming JSON builder/formatter, you will not be able to access the message payload. If you want to access/modify the payload, that can only be achieved using script mediator. To access/modify JSON paylaod, you can use mc.getPayloadJSON() or mc.setPayloadJSON() methods as explained in http://docs.wso2.org/display/ESB470/Sample+441:+Exposing+a+SOAP+Service+Over+JSON-->

Simulating RESTful services with soapUI

$
0
0
I have discussed about the mock services which simulate SOAP back-ends in chapter 6 of Web Services Testing with soapUI book. For the past few years, service orientation has been shifting towards RESTful web services from SOAP which demands the necessity of mocking various types of RESTful services. Being the one-stop tool kit of SOA developers/testers, soapUI provides users with different options to simulate RESTful services. In this post, I will discuss one of such a simple mechanisms to create RESTful mock services in soapUI.

Pre-requisites:

soapUI-4.5.2 or later

Simulating POX (Plain-Old-XML) with soapUI

Suppose you have a web service which returns XML response. Usually, the HTTP Content-Type of such a message is application/xml or text/xml.
  1. Create a new MOCK Service in soapUI. You can either create a Mock service from a new WSDL (ouch! we are dealing with RESTful services. Why do we need WSDL?? Does not matter. We just want to have a mock service regardless of where it originated from. We will tweak the response to be RESTy. Trust me!) or add a new mock service by right-clicking on an interface of an existing SOAP based service.
  2. Either way, you will have a mock service similar to the following.


    Note that, our mock service will be exposed at http://localhost:8088/restMockService
  3. We are going to simulate a response with text/xml content. Create an XML file in your file system. i.e:-

    <root>
    <child>value</child>
    <root>

    Save the file as xmlresponse.xml.
  4. Once a HTTP request (regardless of the content of incoming message) hits the mock service, it will return XML response. We can execute a groovy script at this time and respond back with XML output. This can be achieved by having a OnRequest Script in soapUI mock service interface. Click on OnRequest Script tab at the bottom pane of mock service editor.
  5. In the OnRequest Script editor, add the following script.

    //To output text/xml
    mockRunner.returnFile(mockRequest.httpResponse, new File("/home/charitha/Desktop/xmlresponse.xml"))
    return new com.eviware.soapui.impl.wsdl.mock.WsdlMockResult(mockRequest)
  6. Start the mock service by clicking on green arrow icon at the top left corner of mock service editor. 
  7. Send any HTTP request to http://localhost:8088/restMockService. You will observe the following output.

    HTTP/1.1 200 OK

    Content-Length: 35

    Content-Type: text/xml

    Connection: close

    Server: Jetty(6.1.26)


    <root>
    <child>value</child>
    <root>


    Simulating JSON output with soapUI

    This is quite similar to the above procedure but a few tweaks are required to format the JSON response to be a valid JSON with application/json content-type.

    1. In the same mock service which we created above (or a different one), we will add a new OnRequest script. First, create a file in your local file system with the following content.

      {
      "getQuote": {
      "request": { "symbol": "WSO2" }
      }
      }

      Save the file as jsonresponse.json.
    2. Now, add the following script as OnRequest Script
      import javax.servlet.http.HttpServletResponse
      import com.eviware.soapui.support.Tools


      def response = mockRequest.httpResponse
      File file = new File("/home/charitha/Desktop/jsonresponse.json")
      FileInputStream fin = new FileInputStream(file)
      response.setStatus( HttpServletResponse.SC_OK )
      long length = file.length();
      response.setContentLength( ( int )length );
      response.setContentType("application/json;charset=utf-8" );
      Tools.readAndWrite( fin, length, response.getOutputStream() );
      fin.close();

      return new com.eviware.soapui.impl.wsdl.mock.WsdlMockResult(mockRequest)

      You will question why we cannot just return the output of jsonresponse.json straight-away as we did with text/xml content. As explained by Ole Lensmar (The creator of soapUI) in http://forum.loadui.org/viewtopic.php?f=2&t=15020&p=36012 , this is a hack to respond back with application/json content-type. If you just return the file, the content-type will be delivered as application/javascript.
    3. Now, restart the mock service and send a HTTP request to above mock service endpoint. You will get a response similar to the following.


      HTTP/1.1 200 OK

      Content-Length: 60

      Content-Type: application/json;charset=utf-8

      Connection: close

      Server: Jetty(6.1.26)


      {
      "getQuote": {
      "request": { "symbol": "WSO2" }
      }
      }


      Similarly, you can simulate what ever RESTful back-end you want with soapUI. For example, if you want to return text/html, create a simple HTML in your file system and add the following script.

      //To output text/html
      mockRunner.returnFile(mockRequest.httpResponse, new File("/home/charitha/Desktop/htmlresponse.html"))
      return new com.eviware.soapui.impl.wsdl.mock.WsdlMockResult(mockRequest)

      To return text/plain response, create a text file in file system and add the following script.


      //to output text/plain
      mockRunner.returnFile(mockRequest.httpResponse, new File("/home/charitha/Desktop/plaintextresponse.txt"))
      return new com.eviware.soapui.impl.wsdl.mock.WsdlMockResult(mockRequest)


Back in blogosphere

$
0
0
I have been away from blogging for more than 2 months. Many of the readers of this blog, asked me if I stopped writing or what. The last few months were hectic due to a many reasons. First, I moved to Bloomington, a beautiful small town in Indiana, USA from my home country, Sri Lanka. Thus, I had to focus on many initial settlement stuff which allowed me very little time to scan through my blog. Next, I had to spend time on adjusting to the totally new environment specially crazy coldness in here.
I believe I'm back in business now. As the tag line of this blog says, "no nonsense", only SOA and testing. Therefore, I'm not going to write about what is happening around me. I will continue sticking to the objective of this blog. Helping at least one person who is stuck figuring out an answer for a problem related to Service-Oriented architecture, enterprise integration or software testing. 

Common mistakes to avoid in WSO2 ESB - 1 - "org.apache.axis2.AxisFault: The system cannot infer the transport information from the URL"

$
0
0
In the next few weeks, you could expect a series of blog posts from me which explain the remedies to avoid some common mistakes which we do when working with WSO2 ESB. This is the first of many.

During the initial rounds of testing your integration solution or even in production systems, you may have come across the following error.

org.apache.axis2.AxisFault: The system cannot infer the transport information from the URL ....

Some of you may have struggled hours figuring out a solution to address this issue. Let me explain this error in detail and possible causes of this. So, next time when you see this error in your WSO2 ESB setup, you will not have to spend time unnecessarily googling everywhere.

There can be many different causes of this error. I have observed  four main reasons.

Cause 1


This is the simplest cause. Suppose, you have a proxy service similar to the following.

<proxy xmlns="http://ws.apache.org/ns/synapse"
name="MistakesTest"
transports="https,http"
statistics="disable"
trace="disable"
startOnLoad="true">
<target>
<inSequence>
<send/>
</inSequence>
<outSequence>
<send/>
</outSequence>
</target>
<description/>
</proxy>


Look at the inSequence of the above proxy. We have defined send mediator without address information. Now, when you send a typical SOAP request over HTTP to this proxy service, ESB does have no way to find where to route the request. The HTTP transport sender which is supposed to route the HTTP request clueless where to forward the request and fails with the following error.

ERROR - ClientUtils The system cannot infer the transport information from the /services/MistakesTest URL.ERROR - Axis2Sender Unexpected error during sending message out
org.apache.axis2.AxisFault: The system cannot infer the transport information from the /services/MistakesTest URL.
    at org.apache.axis2.description.ClientUtils.inferOutTransport(ClientUtils.java:81)


How can we fix this? There are many approaches.

First, you can simply associate address information to the send mediator by defining an endpoint.

<send>
<endpoint>
<address uri="http://localhost:8088/mockaxis2service"/>
</endpoint>

</send>

Or else, you can seek help of WS-Addressing framework. You can fix your client application to send your request with WS-Addressing To header as shown below. Then, Axis2 transport sender in WSO2 ESB, extracts the wsa:To header value of the request and forwards the message to back-end service.

<soapenv:Envelope xmlns:soapenv="http://schemas.xmlsoap.org/soap/envelope/" xmlns:ser="http://service.carbon.wso2.org">
<soapenv:Header xmlns:wsa="http://www.w3.org/2005/08/addressing"><wsa:Action>urn:echoString</wsa:Action><wsa:MessageID>uuid:86b1f69b-f4a2-4f4c-b5c9-54fea095972e</wsa:MessageID><wsa:To>http://localhost:8088/mockaxis2service</wsa:To></soapenv:Header>
<soapenv:Body>
<ser:echoString>
<ser:s>charitha</ser:s>
</ser:echoString>
</soapenv:Body>
</soapenv:Envelope>

We have discussed about the simplest cause for the error which we are trying to solve. Next, let's try to understand another common reason.

Cause 2


Suppose, you have a proxy service similar to the following.

<proxy xmlns="http://ws.apache.org/ns/synapse"
name="MistakesTest"
transports="https,http"
statistics="disable"
trace="disable"
startOnLoad="true">
<target>
<inSequence>
<send>
<endpoint>
<default/>
</endpoint>
</send>

</inSequence>
<outSequence>
<send/>
</outSequence>
</target>
<description/>
</proxy>

Here, we have defined a default endpoint, which does not have an address URI associated with it and the address information is resolved through wsa:To header of the incoming request.
Now, if you send a SOAP request, without wsa:To header, you will get the above error.

How can we fix this?

Obviously, we can include wsa:To addressing header in the request (as explained before).
Or else, you can add an header mediator before send mediator in the above configuration which will set wsa:To header of the request.

<header name="To" value="http://localhost:9090/mockaxis2service"/>

Cause 3


As I explained above, axis2 transport sender, defined at axis2.xml is responsible for forwarding the incoming request.

e.g:-
<transportSender name="http" class="org.apache.synapse.transport.passthru.PassThroughHttpSender">

HTTP and HTTPS transport senders are enabled by default in axis2.xml. Think about a use case similar to the following.
You need to do a transport protocol switching through WSO2 ESB, which is a quite common use case in any ESB. In that case, suppose you have a proxy service similar to the following.

<?xml version="1.0" encoding="UTF-8"?>
<proxy xmlns="http://ws.apache.org/ns/synapse"
name="MistakesTest"
transports="https,http"
statistics="disable"
trace="disable"
startOnLoad="true">
<target>
<inSequence>
<send>
<endpoint>
<address uri="jms:/queue1?transport.jms.ConnectionFactoryJNDIName=QueueConnectionFactory&amp;java.naming.factory.initial=org.apache.activemq.jndi.ActiveMQInitialContextFactory&amp;java.naming.provider.url=tcp://localhost:61616&amp;transport.jms.DestinationType=queue"/>
</endpoint>
</send>
</inSequence>
<outSequence>
<send/>
</outSequence>
</target>
<description/>
</proxy>


In this proxy configuration, the proxy service acts as a JMS producer and forwards the request coming through HTTP channel to a JMS queue (queue1). If you try this scenario, in vanilla version of WSO2 ESB without any modification, you will get the following error.

ERROR - Axis2Sender Unexpected error during sending message out
org.apache.axis2.AxisFault: The system cannot infer the transport information from the jms:/queue1?transport.jms.ConnectionFactoryJNDIName=QueueConnectionFactory&                 java.naming.factory.initial=org.apache.activemq.jndi.ActiveMQInitialContextFactory&java.naming.provider.url=tcp://localhost:61616&transport.jms.DestinationType=queue URL


How can we fix this?

In the default axis2 configuration, the HTTP transport senders are only enabled. Thus, when you we are trying to forward a message through non-HTTP transport such as JMS (or VFS, SAP, FiX, mail etc), ESB cannot finds the transport sender registered against the transport protocol define in endpoint url (in this example, "jms:/")
Thus, you need to stop ESB and enable the relevant transport sender in ESB_HOME/repository/conf/axis2/axis2.xml as shown below.

<transportSender name="jms" class="org.apache.axis2.transport.jms.JMSSender"/>

Cause 4


Let's conclude our discussion by looking at another common reason for "The system cannot infer transport..." error.

When you are working with scenarios related to blocking transport senders, for example, Callout mediator or message processors, you may have come across the same error. These elements use blocking transports to call the external services hence they cannot make use of the default axis configuration defined in ESB_HOME/repository/conf/axis2/axis2.xml.
Think about a scenario, where you use message processor to query a queue and forward the message to an external file server through VFS transport or route to a SAP endpoint.
In this case, even if you enabled, the relevant transportSenders in the default axis2.xml, message processor or Callout mediator is not aware of that. They read the axis configuration from the following locations by default.

In ESB-4.8.0 or above:
ESB_HOME/repository/conf/axis2/axis2_blocking_client.xml

In ESB-4.7.0 or below:
ESB_HOME/samples/axis2Client/client_repo/conf/axis2.xml

Thus, if you do not enable transport senders in those locations, you get the same error.


Common mistakes to avoid in WSO2 Carbon - 2 - "java.sql.SQLException: Total number of available connections are less than the total number of closed connections"

$
0
0
This is the second post of common mistakes blog series which I'm planning to share with you. In this post, we are looking into another common mistake which we do when working with WSO2 Carbon platform.

Registry mounting is a way of federating the registry space across multiple servers in a product cluster. For example, if you have a WSO2 ESB cluster, you can use a single registry space to store all configuration data common to cluster nodes.
There are 3 different registry spaces provided by each WSO2 Carbon product; local, configuration and governance. You can find more details about these spaces in here.

We have to keep in mind a few important concepts when building a shared registry setup. You cannot share the local registry space among multiple cluster nodes. The local registry space is used to store node-specific data hence it should not be shared among other nodes in the cluster. However, we mistakenly do this when configuring shared registry setups and experience many unexpected issues. The following weird startup error is one such occurrence due to incorrect mounting configurations (I removed some part of the complete stack trace for clarity).

ERROR - RegistryCoreServiceComponent Failed to activate Registry Core bundle
org.wso2.carbon.registry.core.exceptions.RegistryException: Failed to close transaction.
    at org.wso2.carbon.registry.core.jdbc.dataaccess.JDBCTransactionManager.endTransaction(JDBCTransactionManager.java:183)
--   

Caused by: java.sql.SQLException: Total number of available connections are less than the total number of closed connections
    at org.wso2.carbon.registry.core.jdbc.dataaccess.JDBCDatabaseTransaction$ManagedRegistryConnection.close(JDBCDatabaseTransaction.java:1349)
    at org.wso2.carbon.registry.core.jdbc.dataaccess.JDBCTransactionManager.endTransaction(JDBCTransactionManager.java:178)


This error does not give any clue about a problem related to mounting. You may have spent many hours unnecessarily to tune up your DBMS since the error says about DB connections! 

Let's explore this error in detail.

Step 1


We are going to have a shared registry database (which is used as configuration and governance registry spaces in a ESB cluster). I will use mySQL and create a database first.

mysql> create database sharedreg_db;


Next, create the registry DB schema using mySQL database scripts available in CARBON_HOME/dbscripts directory.

mysql> use sharedreg_db;
mysql> source /home/charitha/products/esb/tmp/wso2esb-4.8.1/dbscripts/mysql.sql;


Step 2


We will register this new database in master-datasources.xml which can be found at
CARBON_HOME/repository/conf/datasources directory

<datasource>
<name>WSO2_SHARED_REGISTRY_DB</name>
<description>The datasource used for shared registry</description>
<jndiConfig>
<name>jdbc/WSO2SharedRegDB</name>
</jndiConfig>
<definition type="RDBMS">
<configuration>
<url>jdbc:mysql://localhost:3306/sharedreg_db</url>
<username>root</username>
<password>root</password>
<driverClassName>com.mysql.jdbc.Driver</driverClassName>
<maxActive>50</maxActive>
<maxWait>60000</maxWait>
<testOnBorrow>true</testOnBorrow>
<validationQuery>SELECT 1</validationQuery>
<validationInterval>30000</validationInterval>
</configuration>
</definition>
</datasource>

Step 3


Now, we have a shared registry database. We need to mount the registry collections to this remote database. There are 3 mounting mechanisms; JDBC, Atom and WS. The commonly used pattern is JDBC mounting. Hence I will use the same.
Mounting configuration can be done in CARBON_HOME/repository/conf/registry.xml as shown below.

<remoteInstance url="https://localhost:9443/registry">

<id>instanceid</id>

<dbConfig>wso2registry</dbConfig>

<readOnly>false</readOnly>

<enableCache>true</enableCache>

<registryRoot>/</registryRoot>

</remoteInstance>

<mount path="/_system/config" overwrite="true">

<instanceId>instanceid</instanceId>

<targetPath>/_system/nodes</targetPath>

</mount>
<mount path="/_system/governance" overwrite="true">

<instanceId>instanceid</instanceId>

<targetPath>/_system/governance</targetPath>

</mount>

Make a note of the highlighted configuration parameter.

Now, the database configuration referred by the mount is defined at the top of registry.xml as follows.
We simply change the JNDI name of the default db config; jdbc/WSO2CarbonDB to the JNDI name of our shared registry database; jdbc/WSO2SharedRegDB

<currentDBConfig>wso2registry</currentDBConfig>

<readOnly>false</readOnly>

<enableCache>true</enableCache>

<registryRoot>/</registryRoot>


<dbConfig name="wso2registry">

<dataSource>jdbc/WSO2SharedRegDB</dataSource>

</dbConfig>


OK. Assuming everything is configured correctly, we start Carbon server. Unfortunately, you will get the above meaningless error at the server startup.

What is wrong here?


By defining a common data source for mount configuration as well as local registry definition (under currentDBConfig element), we have done a big mistake. This will eventually leads to share local registry space among heterogeneous product cluster nodes which is theoretically incorrect.  

How can we fix this?


Simple. You can define a separate, unique database configuration for the shared registry db.

<dbConfig name="sharedregistry">

<dataSource>jdbc/WSO2SharedRegDB</dataSource>

</dbConfig>


Then, that will be referenced by the remote mounting configuration.

<remoteInstance url="https://localhost:9443/registry">

<id>instanceid</id>

<dbConfig>sharedregistry</dbConfig>

<readOnly>false</readOnly>

<enableCache>true</enableCache>

<registryRoot>/</registryRoot>

</remoteInstance>

Finally, make sure to change the local registry definition back to its default so that it will use the WSO2 Carbon DB (usually H2).


<dbConfig name="wso2registry">

<dataSource>jdbc/WSO2CarbonDB</dataSource>

</dbConfig>

Restart the server. The error will disappear!


Common mistakes to avoid in WSO2 API Manager - "ERROR - APIAuthenticationHandler API authentication failure" for a API call with valid access token

$
0
0
In the third post of the common mistakes to avoid in WSO2 Carbon platform blog series, I'm going to look at another frequently raised question.  I have been struggling to get rid of this issue for few hours recently and figured out the fix by consulting one of my colleagues, Nuwan
Let's look at the problem in detail.

Problem


Suppose I'm calling a REST API hosted in WSO2 API Manager with a set of query parameters as shown below.

GET http://192.168.1.10:8280/qa/1.0/GetData?name=charitha&city=colombo HTTP/1.1 

In order to match with the GET URL/query parameters, I define the url-pattern in API publisher as shown below.


Note****
We cannot define a uri-template in API publisher UI in the latest version of API Manager (At the time of writing, it is API Manager 1.6.0).

However, the specified url-pattern, /GetData/* does not match with the request URL since my API call contains a set of query parameters.

Thus, I open the API configuration file which is stored in repository/deployment/server/synapse-configs/default/api directory in API Manager distribution and modify the resource definition as follows.

<resource methods="GET" uri-template="/GetData?*">

I simply modified url-mapping into uri-template and changed its value to "/GetData?*" so that my request will be accepted by the API  resource definition.

After saving the configuration in file system, I subscribe to the API in store and send a GET request.
I expect everything is correct since the API definition matches with the request perfectly. But I get a HTTP 403 response with the following error in log!

ERROR - APIAuthenticationHandler API authentication failure
org.wso2.carbon.apimgt.gateway.handlers.security.APISecurityException: Access failure for API: /qa, version: 1.0 with key: _Zj7PHU1pvw16lWGq0JHCDSFoE8a
    at org.wso2.carbon.apimgt.gateway.handlers.security.oauth.OAuthAuthenticator.authenticate(OAuthAuthenticator.java:139)
    at org.wso2.carbon.apimgt.gateway.handlers.security.APIAuthenticationHandler.handleRequest(APIAuthenticationHandler.java:92)
    at org.apache.synapse.rest.API.process(API.java:285)
    at org.apache.synapse.rest.RESTRequestHandler.dispatchToAPI(RESTRequestHandler.java:76)
    at org.apache.synapse.rest.RESTRequestHandler.process(RESTRequestHandler.java:63)


This confuses me a lot. I double check my access token. It is valid. I try again generating a new token. No luck. Still getting the same authentication failure. Why??

What is wrong here?


When you publish an API through the API publisher UI, the corresponding api config artifact is created in file system. But that is not the only reference. AM_API_URL_MAPPING table, which is in API Manager database (WSO2AM_DB by default in H2)) is also updated with the specified url-pattern value. So in our example, it will be written to that table as "/GetData/*" (this is what we have specified when publishing API in API Publisher UI)
Even though we have changed the API definition in file system as mentioned above, this value in database is not changed. Also, when matching a particular url-pattern, API manager does it at two levels. It validates the auth type of the resource against token using url-mapping (in the above table) and then proceed with the url-pattern validation using the corresponding API definition (file system).

In our example, though we have changed the API resource definition in API configuration file, the database still contains "/GetData/*" as the url-mapping value. Hence, the first level of validation of the request (matching auth type of the resource against token using url-mapping in AM_API_URL_MAPPING table) fails and returns the above error.

How can we fix this?


The fix is simple. Go to API publisher UI and select the published API. Then click on Edit to update the API.
Modify the URL pattern as "/*".


Next, you have to do the same resource modification in API configuration file in repository/deployment/server/synapse-configs/default/api
 

<resource methods="GET" uri-template="/GetData?*">

Save everything and send a request again. It will be successful.


Handling JSON responses in Apache JMeter

$
0
0
There are various types of post processor elements that we can use out of the box when handling responses in a JMeter test plan. For example, Regular Expression Extractor can be used to capture a specific value or set of values from a XML, HTML or JSON response.
However, handling JSON responses through the default regular expression extractor will be a daunting task when the JSON response becomes complex. When handling complex XML responses, Xpath extractor is the obvious choice in JMeter. Similarly, it will be quite efficient to have a similar post processor element to handle complex JSON responses.
JSONPath is a way to extract parts of a given JSON document and is now available in many programming languages. In this simple post, we will look at how we can use JSONPath expressions to extract values from JSON responses in JMeter.

Pre-Requisites:

Download and install JMeter version 2.8 or later

Step 1

Download this JMeter plugin library and unzip JMeterPlugins-ExtrasLibs-1.1.3.zip
Copy the content under lib/ directory to JMETER_HOME/lib (this will merge with the existing content)

Step 2

Restart JMeter and start to create a new test plan. Add a new thread group. Then add a HTTP Request sampler. Enter the following values.
Server name : ip.jsontest.com
Method : GET

Leave the other attribute values as they are.

Step 3

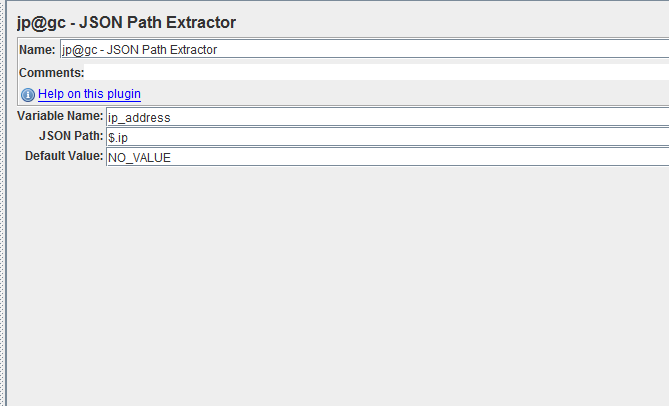
Right-click on the above HTTP Request Sampler and select Add --> Post Processors --> jp@gc - JSON Path Extractor
Enter the following values.

Variable name: ip_address (this is just a reference)
JSON Path: $.ip
Default value: NO_VALUE


Step 4

Add a Debug sampler so that we can check the extracted value. You can add Debug sampler by right clicking on the thread group and selecting Add --> Sampler --> Debug Sampler

Step 5


Add View Results Tree listener and save the test plan. Then run the test. You will see the following response.

{"ip": "50.151.197.63"}

Step 6

The above simple JSONPath expression ($.ip) should return the ip address value from the JSON response. Check the Debug sampler output. It will look similar to the following.

JMeterVariables:
JMeterThread.last_sample_ok=true
JMeterThread.pack=org.apache.jmeter.threads.SamplePackage@61191c78
START.HMS=222538
START.MS=1401036938959
START.YMD=20140525
TESTSTART.MS=1401039015874
ip_address=50.151.197.63

The ip address value was extracted from theSON response and assigned to ip_address variable which we have specified in the JSON Path Extractor definition.

We can now use this variable down in our JMeter test plan to use in various other samplers. 

How to enforce a default HTTP Content-Type for requests in WSO2 ESB

$
0
0
Occasionally, you will get requests from legacy client applications that do not include HTTP Content-Type header. WSO2 ESB proceeds with the mediation flow only after building the relevant SOAP infoset using the message builders registered against the Content-Type of the incoming request. In case the Content-Type is blank, you will experience an error similar to the following in the log.

ERROR - RelayUtils Error while building Passthrough stream
java.lang.StringIndexOutOfBoundsException: String index out of range: -1 

If modification of client applications to include the mandatory Content-Type HTTP header in POST requests is out of your control, we should be able to set a default content type for such incoming requests. In WSO2 ESB, you can use the following property to set a default Content-Type for the incoming requests in case the HTTP request does not have Content-Type header.

i.e:-


<parameter name="DEFAULT_REQUEST_CONTENT_TYPE" locked="false">application/json</parameter>

Set this property in ESB_HOME/repository/conf/axis2/axis2.xml and restart the server. Here, we have configured application/json as the default content type. So that, when a request similar to the following reaches ESB, the default JSON builder registered for application/json content (org.apache.synapse.commons.json.JsonStreamBuilder in WSO2 ESB-4.8.1) takes care of building the message and hands it over to mediation engine to proceed with the mediation flow.


POST http://host:8280/services/ContentTest HTTP/1.1
Accept-Encoding: gzip,deflate
Content-Length: 30
Host: host:8280
Connection: Keep-Alive
User-Agent: Apache-HttpClient/4.1.1 (java 1.5)

{
  "in": { "test": "wso2" }
}

Testing Service-Oriented Solutions

$
0
0
I have been discussing about testing service oriented solutions through a lot of blog posts as well as this book. I just want to summarize some key points, specially since I switched from SOA middleware testing to service-oriented solutions testing.

Automation is the key


You should not even think about QA approach without automation when it comes to service oriented solutions. I observe three distinct entities involved in service oriented solution testing approaches.

Services Testing
End-to-End Testing
UI Testing

Individual services can be tested as they make available for testing. In case, they are not ready or under implementation and QA is blocked to verify integration flows, you can use service simulation mechanisms. soapUI mock services will be handy in this. Testing the functionalities of individual services should be 100% automated and continuously deployed to the release/testing branches. Since SOAP web services are already dead, there is no need to spend time on experimenting various testing tools. RESTful services can be tested using simple HTTP clients and can easily be integrated into main code branches without much efforts.

End-to-End testing should also be automated as much as possible. An 80% goal may be realistic and achievable. End-to-End testing should also be done by by-passing front-end and combining invocations of various services.

UI testing will also be equally important based on the nature of the solution. The UI regressions are tedious and must be automated using a web test framework such as Selenium web driver. However, the focus on UI automation should be the last out of all automation approaches since the maintainence burden of UI automation is high comparing to the rest.

Even if you do majority of automated testing, you cannot replace human brain when releasing software. With a large percentage of automated tests, the testers could spend a lot of time analyzing user behavior to derive exploratory tests.

QA should not be an after-thought


This is not about TDD (Test-driven development). But everyone in the team should equally responsible for the quality of the final deliverable. Therefore, each service developer must work with QA teams to design high quality test plans and review the test cases since the initial phases of release cycles.

Study your users


According to my understanding, the best way to derive test scenarios is studying your users closely. See how they use the previous versions of your service oriented solution. If it is a brand new version, study similar/competitive products. Then, derive test scenarios which mimics the real world use cases.


Myth of 100% test automation

$
0
0
Can ALL tests be automated? Needless to say that putting effort on automating "some % of" scenarios is not worthwhile. I have identified some obvious examples;


  • Scenarios which involve time consuming work-flow executions
  • Unstable features
  • Some end-to-end scenarios where assessing multiple outputs by humans are must
  • Usability assessments
  • Tricky timing related/inconsistent bugs


Why do some engineering teams praise on 100% automated coverage even knowing these well-known facts?
My understanding is, they do not know what QA is! When quality is just an afterthought and presence of critical bugs in products is not an important matter, praising 100% automation and living in that dream is the best way forward just for the sake of temporary satisfaction. First, understanding the difference between Testing and Checking is very important since that can prevent setting the unrealistic goals and expecting something not possible from test automation.
Michael Bolton once defined these two terms concisely in here and then refined the same by James Bach in here. I would recommend these two articles for anyone who needs more understanding about what professional testing is.

--Open for further discussion

Exploratory Testing 3.0

$
0
0
James Bach and crew have re-defined software testing as follows.

“Testing is the process of evaluating a product by learning about it through exploration and experimentation, which includes: questioning, study, modeling, observation and inference, output checking, etc.”

I believe this perfectly makes sense and a very important step towards building "responsible testers". You could read more about this in http://www.satisfice.com/blog/archives/1509

Fuzz testing web service APIs

$
0
0
Fuzzing is a mechanism to exercise software with random inputs. Fuzz testing is an integral component of API verification and it helps to uncover potential failures due to incorrect input handling.
While you can find more information about fuzz testing from various web references, this post intends to summarize some key principles/best practices associated with fuzzing.


Fuzz test planning

Your AUT (Application Under Test) may consists of hundreds of APIs. However, it will not make sense to exercise all APIs with fuzz testing. For example, I usually take the APIs which are directly called by consumer applications for fuzz testing. Similarly, study your APIs and choose the APIs which are highly sensitive for user interactions. 


Execute Fuzz testing

Once you identify the APIs that are important to be fuzzed, figure out an approach to execute fuzz testing. Manual fuzzing should be out of scope. You should plan for an automated fuzzing mechanism.
You may try fuzzing APIs with web services testing tool such as soapUI. soapUI NG Pro provides you with fuzz testing facility as part of its security testing component. 

You will also consider building a custom fuzz testing framework instead of using a separate tool. A custom framework can analyze API model ( or WADL in a REST service or WSDL in case of SOAP based services) and generate random inputs. Building such a framework will not be a complex effort and you should be able to plug it as part of continuous integration system. So that, fuzzing will be done seamless manner without any human interaction. Due to the flexibility and ease of maintenance, I prefer the second approach of having a custom in-house fuzzing framework. 


Analyze Results

Regardless of the tool/framework used for fuzz testing, it will be important to analyze the results either automated or manual approach. You will automatically assert Expected Exceptions using the in-built facilities provided by testing frameworks.  


Testing in microservice architecture

$
0
0
Microservice architecture is no longer a strange term. There are many discussions about testing approaches in microservice based systems too. For example, this article explains a very nice strategy to adopt when testing a solution based on microservice architecture.
I thought to share some of my recent experiences with microservices testing and how microservices enable testability of a complex distributed systems. Note that, this post is not about suggesting another strategy for testing microservice architectures but some key learnings in testing microservices.

Microservices has become a widely discussed topic during the last few years. In September 2011, well before the microservice term was introduced, I did a session on SOA testing in open source software conference, WSO2Con. I have introduced a component based testing approach for SOA during my presentation and discussed about various levels of testing in a service-oriented solution.
I highlighted the importance of component level testing in detail during that presentation and suggested it as one of the key pieces in any SOA test strategy.

After 2-3 years, I see the same methodology is being suggested for microservices testing by many industry leaders/technical advocates. The strategy that I presented back in 2011, made possible mostly under microservices architecture since it enables independent development/deployment of services.

Amazon has been a pioneer in service oriented architecture  since its inception and each functionality/feature at amazon is built as a webservice. You could find more information about this in some public references such as this and this. Amazon has been indirectly adopting microservices architecture as explained in those references. Since I was employed at Amazon nearly 1 year back, I got the opportunity to observe and then adopt many service oriented testing strategies that I discussed during the early days of SOA. This post is intended to summarize two key points related to testing in microservice architecture.

Individual services testing


Microservices architecture reveal a new set of boundaries of individual components in a software. This allows higher level of decomposition of software which can be tested quite independently.
For example, feature X is decomposed into restful web services (or APIs) X1, X2... Xn. A good microservice should be independently developed and deployed. Thus some of these individual web services may just provide an interface to CRUD (Create, Read, Update, Delete) operations in a database. Testing such a service should be trivial through automated tests (e.g:- HTTP clients). In case the service consists of multiple dependent services which are not available at the time of testing, stubbed version (mocks) of those services should facilitate proceeding with individual services testing.

Microservices enable continuous deployment

One of the major advantages of adopting microservices architecture is, it facilitates fast phased deployment of web services in fully automated fashion. Testing teams can start working on service level automated tests well before the code is pushed into testing environment. Service stubs and API specs allow testing team to build basic test utilities in advance. Once the code is ready in test environment, the automated tests exercise all resources in RESTful API (microservice).
When the service is integrated with other dependent services, the same set of tests with minimal or no modifications could be run as integration tests.
With these automated tests, microservices are deployed to production without minimal human intervention.

Testing in microservices architecture closely resembles well-known test pyramid. I will relate the layers in test pyramid into microservices testing and discuss further in my next blog post. Stay tuned!


My Quora answer: Is software quality assurance a good career? Why or why not?

$
0
0
A few weeks back, I answered a query on Quora about the software quality assurance profession.
It became one of the mostly viewed posts in SQA topic and noticed a lot of upvotes recently.
Hence, thought to share this here for the readers of my blog.

Is software quality assurance a good career? Why or why not?

Let me try to answer with respect to my career as a software quality assurance engineer for 12 years. 

I was unable to pursue bachelor degree with computer science as a major. But I badly wanted to join software industry for whatever position which someone could offer me. Back in 2003, I, with another set of my university batch mates were interviewed by a software services provider for a position called, "Associate software quality assurance engineer". I had no idea what software quality assurance means. Read two chapters in software engineering books by Ian Somerville and Roger Pressman. That was the only knowledge that I had about software quality assurance when I faced my first interview. I was able to get through the interview and landed in my first job.
Within the first few weeks of my career, I realized that having end-to-end understanding of software is the key to test it effectively. I spent long hours learning the software that I was asked to test. Eventually, I was able to uncover many critical bugs based on my understanding of the software as well as its eco-system. That helped me to build the trust on fellow team mates including PMs, SDEs etc..
I advanced in my career simply due to my approach towards testing. In a few years, I switched companies and lead a QA team in open-source enterprise middleware provider, WSO2. The mere testability of middleware had been a challenge but I was able to research and find interesting approaches to make untestable software testable and fill bug tracking systems with hundreds of real bugs.
With this, I was able to earn the trust of fellow engineers and I felt that I was adding value to the team. I was flexible and context-driven for project needs. Never adhered to process standards taught in some software QA certifications but spent time on learning new trends, technologies specific to my domain.
I still spend my time on reading whatever specific to QA and share my learnings through my blog. With my passion and attitude towards software quality assurance, I realized that I would move forward and explore more on how software is built and tested in top tech companies. My attempt on exploring was successful.
Nearly 1.5 years back, I was contacted by Amazon for a software quality assurance engineer position. I decided to take the opportunity and proceeded with amazon. I was offered software quality assurance engineer position after an extremely tough interview process. I quickly adapted to the environment but did not change my approach towards testing. I started at amazon with spending long hours learning the applications that I was assigned to test. I mastered the applications as well as all services that made up the system. That way, I was able to uncover critical bugs, help to deliver software quickly, which eventually made me a key contributor of the team.
Software quality assurance has never been a boring job for me. In some web applications which involve rich UI interactions with repetitive UI clicks through multiple pages, I made testing interesting by covering all business logic testing at the web services level. When feature designs are complete, I start test strategy and plan. I never act as quality police or a gatekeeper who merely control software releases at the end of cycle. I collaborate with developers, understand the changes/implementation and build my test strategy accordingly. This way, I reduce time which spent unnecessarily on regression. I trust test automation pyramid and focus on automating more on service layer instead of brittle/unmaintainable UI. I admire great testers/autohrs of our era such as Elisabeth Hendrickson, James Bach, Michael Bolton etc and adjust my approaches based on their great suggestions.
Thus, software quality assurance has been an AWESOME career for me. I was appreciated, recognized, paid well and promoted based on my contributions as a software quality assurance engineer.
My advice is, software quality assurance is a great career. But you should follow simple set of principles to become successful as a QAE. In my experience, those are

  • Enthusiasm in learning new business domains, technologies
  • Passion and commitment
  • Flexibility
  • Team working
  • Ownership

Similarly, QA can become boring, easily replaceable, mundane job if you build your careers based on the followings

  • Enforcing old school policies on engineering teams that make faster deliveries impossible. This will make you the sole "approver" of software and the job will become hectic.
  • Not investing time on reducing repetitive manual testing overhead
  • Considering software as a complete black-box in testing and not focusing on how everything is connected together
  • Adhering to principles that you learned in software testing certifications without adjusting your approach based on project context


  • Treating testing as checking (following list of test cases, mark them pass/fail and announce testing is done)

How to connect WSO2 ESB to Apache ActiveMQ using simple authentication

$
0
0
There are different types of pluggable authentication mechanisms provided by Apache ActiveMQ message broker. One of the quickest and easiest mechanisms is to use simple authentication. As the name implies, it is as simple as adding authentication details to ACTIVEMQ_HOME/conf/activemq-security.xml


<plugins>
<!-- Configure authentication; Username, passwords and groups -->
<simpleAuthenticationPlugin>
<users>
<authenticationUserusername="system"password="${activemq.password}"
groups="users,admins"/>
<authenticationUserusername="user"password="${guest.password}"
groups="users"/>
<authenticationUserusername="guest"password="${guest.password}"groups="guests"/>
</users>
</simpleAuthenticationPlugin>


In this simple configuration, passwords of each user is defined in ACTIVEMQ_HOME/apache-activemq-5.7.0/conf/credential.properties file.


You can find more details about ActiveMQ simple authentication plugin in this blog.

Suppose, you have started Apache ActiveMQ with simple authentication. Then, any consumer of the destinations defined in your ActiveMQ broker should connect using the credentials defined under simple authentication plugin.

If WSO2 ESB needs to connect to ActiveMQ configured with simple authentication, we can simply update the broker configuration details in ESB_HOME/repository/conf/axis2/axis2.xml as shown below.

<transportReceivername="jms"class="org.apache.axis2.transport.jms.JMSListener">
<parametername="myTopicConnectionFactory"locked="false">
<parametername="java.naming.factory.initial"locked="false">org.apache.activemq.jndi.ActiveMQInitialContextFactory</parameter>
<parametername="java.naming.provider.url"locked="false">tcp://localhost:61616</parameter>
<parametername="transport.jms.UserName">system</parameter>
<parametername="transport.jms.Password">manager</parameter>

<parametername="transport.jms.ConnectionFactoryJNDIName"locked="false">TopicConnectionFactory</parameter>
<parametername="transport.jms.ConnectionFactoryType"locked="false">topic</parameter>
</parameter>

<parametername="myQueueConnectionFactory"locked="false">
<parametername="java.naming.factory.initial"locked="false">org.apache.activemq.jndi.ActiveMQInitialContextFactory</parameter>
<parametername="java.naming.provider.url"locked="false">tcp://localhost:61616</parameter>
<parametername="transport.jms.UserName">system</parameter>
<parametername="transport.jms.Password">manager</parameter>

<parametername="transport.jms.ConnectionFactoryJNDIName"locked="false">QueueConnectionFactory</parameter>
<parametername="transport.jms.ConnectionFactoryType"locked="false">queue</parameter>
</parameter>

<parametername="default"locked="false">
<parametername="java.naming.factory.initial"locked="false">org.apache.activemq.jndi.ActiveMQInitialContextFactory</parameter>
<parametername="java.naming.provider.url"locked="false">tcp://localhost:61616</parameter>
<parametername="transport.jms.UserName">system</parameter>
<parametername="transport.jms.Password">manager</parameter>

<parametername="transport.jms.ConnectionFactoryJNDIName"locked="false">QueueConnectionFactory</parameter>
<parametername="transport.jms.ConnectionFactoryType"locked="false">queue</parameter>
</parameter>
</transportReceiver>

Note that highlighted parameters (transport.jms.UserName and transport.jms.Password) which are used to connect to the broker using simple authentication.

The above configuration can be used to connect any Apache Axis2 based server (Apache Axis2, WSO2 Application Server etc..) to ActiveMQ using simple authentication.

TIP: Error handling in WSO2 ESB APIs when the requested API resource does not match with the given URL template or pattern

$
0
0
When you send a HTTP request to an API in WSO2 ESB, if the requested API resource URL does not comply with the API resource definition, ESB returns HTTP 202 accepted response to the user. Due to  this behavior, the client is unable to distinguish if they have made an error. We can use the following procedure to return a fault to the client in case of non-matching API resource is requested by client.

Step 1:

Suppose, we have an API similar to the following. Note that, the target web service is a JAXRS web application (jaxrs_basic) which is included in WSO2 Application Server by default.

<api xmlns="http://ws.apache.org/ns/synapse" name="jaxrs" context="/jaxrs">
<resource methods="GET" uri-template="/customers/{id}">
<inSequence>
<send>
<endpoint>
<address uri="http://localhost:9764/jaxrs_basic/services/customers/customerservice"/>
</endpoint>
</send>
</inSequence>
<outSequence>
<send/>
</outSequence>
</resource>
</api>

Step 2:

Send the following HTTP GET request to the above API. (You can use a soapUI web testcase as instructed in one of my previous blog posts).

GET http://localhost:8280/jaxrs/customers-wrong/123

Step 3:

You will get HTTP 202 accepted response because the request URL does not match with the resource url-template defined in the API.

Step 4:

Now, add the following fault handling sequence in ESB. Once the API receives a request which does not match with any of the resource url patterns/templates, this sequence will be invoked. Make sure to name the sequence as _resource_mismatch_handler_

<sequence xmlns="http://ws.apache.org/ns/synapse" name="_resource_mismatch_handler_">
<payloadFactory>
<format>
<tp:fault xmlns:tp="http://test.com">
<tp:code>404</tp:code>
<tp:type>Status report</tp:type>
<tp:message>Not Found</tp:message>
<tp:description>The requested resource (/$1) is not available.</tp:description>
</tp:fault>
</format>
<args>
<arg xmlns:ns="http://org.apache.synapse/xsd" expression="$axis2:REST_URL_POSTFIX"/>
</args>
</payloadFactory>
<property name="RESPONSE" value="true" scope="default"/>
<property name="NO_ENTITY_BODY" action="remove" scope="axis2"/>
<property name="HTTP_SC" value="404" scope="axis2"/>
<header name="To" action="remove"/>
<send/>
<drop/>
</sequence>

Step 5:

Send the above HTTP GET request again. This time, you will get a proper error as shown below.

HTTP/1.1 404 Not Found
Content-Type: application/xml; charset=UTF-8
Accept-Encoding: gzip,deflate
Host: 10.100.3.37:8280
Date: Fri, 16 Nov 2012 06:06:51 GMT
Server: Synapse-HttpComponents-NIO
Transfer-Encoding: chunked

TIP: How to view log statements generated by WSO2 ESB log mediator in System Logs UI?

$
0
0
When you use log mediator inside sequences and proxy services in WSO2 ESB , the logs are shown by default in wso2carbon.file which can be found in CARBON_HOME/repository/logs directory. The same logs are viewable from "System Logs" page in ESB management console.
However, from ESB-4.5.X releases, you should do the following simple change in order to see these logs in "System Logs" UI in management console.

Step 1
Open CARBON_HOME/repository/conf/axis2/axis2.xml

Step 2
Uncomment the following element.

<handler class="org.wso2.carbon.utils.logging.handler.TenantDomainSetter" name="TenantDomainSetter">

Now, restart the server. Send a request to ESB and see the logs in "System Logs" UI in management console.
Viewing all 66 articles
Browse latest View live


Latest Images